What is used to install and manage angular cli globally?
$ sudo npm install -g @angular/cli
Note: You need node version 20.11.1 to install angular. Do the following: $ nvm install v20.11.1 to install and use v20.11.1, which will take care of the EBADENGING warnings on npm install.
How do you view which version of angular is installed?
$ ng --version
How do you create a new angular project?
$ ng new hello-world
Which stylesheet format would you like to use? CSS
Do you want to enable Server-Side Rendering (SSR) and Static Site Generation (SSG/Prerendering)? No [???No idea if this is right]
How do you tell your environment to open vscode when you type $ code .
In command palette enter > code and select Shell Command: Install 'code' command in PATH
In vscode, how do we start the angular server?
$ ng serve
How do you run a static website locally?
npm install http-server -g http-server
What is the e2e directory in your angular project and what does it stand for?
e2e: End to end tests. This is the directory where we write our tests for angular.
What are the bare minimum files in the app directory for every application?
One module ie: app.module.ts, and one component: app.component.ts
Where do we put environment settings for either production or development environments?
Typically they are placed in the app/environments folder
In what directory do we store the index.html file?
Typically, src/environments
What is the starting point for our application?
src/main.ts
How do we bootstrap the main module of our application?
Place the name of the main module (usually AppModule.ts) inside the main.ts file. platformBrowserDynamic() bootstrapModule(AppModule);
Where do we specify which environment we are going to run?
In main.ts: if (environment.production) { enableProdMode(); }
What is webpack?
A build automation tool.
What is webpack responsible for?
It takes all of our scripts, stylesheets, combines them in a bundle and then minifies the bundle for optimization.
What is the polyfills.bundle.js file?
It takes all the scripts to fill the gap between the version of javascript that angular needs and the version of javascript that most browsers need.
What is contained in the main.bundle.js file?
All of your source code
What is contained in the styles.bundle.js
All of your styles files
What is contained in the vendor.bundle.js?
All of the libraries from 3rd party vendors included in your project.
Where are the webpack bundles referenced in your code?
They're included within the script tags of your index.html file. This happens at runtime, so you won't see this in your index.html within your source directory.
What are the versions of Angular?
AngularJS
The first version, written in 2009, is javascript-based.
Angular 2
Released in September 2016, this version was a complete rewrite of AngularJS and was written entirely in TypeScript. It was mobile-oriented and offered more language choices.
Angular 4
This version was an improvement on Angular 2 and was backward compatible with it. Consider it Angular 2.4 - to update the router library to the same version number.
Angular 7
Released in October 2018, this version focused on the Ivy project, which made it easier for developers to create single-page applications.
Angular 10
Released in June 2020, this version increased the minimum TypeScript capability to 3.9 and added a date range picker. It also improved application performance and browser compatibility.
Angular 11
Released at the end of 2020.
Angular 12
Released in 2021.
Angular 13
Released in November 2021, this version included new features and changes, such as:
Ivy-based features and optimizations
End of IE11 support
Improvements to Angular CLI
Framework changes and dependency updates
Improvements to Angular Tests
Angular 15
Released in November 2022, this version included stable standalone APIs, which allowed developers to build apps without Ng Modules.
Angular 16
Released in May 2023
Angular 17
Released in November 2023
What type of logic do we implement on the client side?
Application logic
Business logic
Presentation logic
Data Access logic
Presentation Logic
Essentials: Section 2: Fundamentals of TypeScript and OOP
Ch 14:00:32: Does typescript come with Angular?
No! You need to install typescript.
Ch 14:00:32: How do you install typescript
$ sudo npm install -g typescript
Ch 14:00:44: What is the command to show the version of typescript that's installed
$ tsc --version or by running the typescript server: $ ng serve to transpile all of our typescript files.
Ch 14:01:59: How do you transpile a typescript file from the command line?
$ tsc main.ts
$ ng serve will automatically transpile code
After the code has been transpiled, you can run it using the js file with $ node < fileName >.js
Ch15:03:08 Define the scoped area for : var, let, and const .
var: scoped outside of the block where it is declared in.
let: scoped inside only of the block where it is declared.
const: it doesn't actually mention const scope.
Ch 16:04:20: How do you declare an enum array in typescript such that each element is automatically assigned a value?
enum Color { Red, Green, Blue, Purple }
The values of Red, Green, etc. are automatically assigned the index of the element as though it were an array where Red = 0; Green = 1; etc.
Ch 15:05:39: How do you assign specific values to an enum in typescript?
enum Color { Red = 'Red', Green = 'Green' }; let backgroundColor = Color.Red // "Red"
Ch 17:01:49 In typescript, what is "type assertions"
The same as type casting however we use angle brackets to assert the type: <string> i.e.: let message;
message = 'abc';
let endsWithC = (<string>message).endsWith('c');
or let alternativeWay = (message as string).endsWith('c'); At the very end of the chapter: Note - with this alternative way we are not changing the type of the variable at runtime, just helping intellisense understand what type of variable it is.
How do you run a test angular file, much like opening node and running javascript?
cd to a directory that is not an angular project directory (has no node modules)
Create a main.ts file and insert your angular code in it.
In a terminal, run: tsc main.ts && node main.js
Ch 17:03:10: What is an interface?
An interface defines the shape of an object. This helps intellisense help you understand the form of parameters and assignments.
Ch 19:02:01: What is inline annotation?
Where you define the type of the variable inline. i.e.: const drawPoint = (point: { x: number, y: number} ) { //... }
Ch 19:02:33: What is a better approach to inline annotation if you use this concept in multiple places?
Define an interface. i.e.: interface Point {
x: number,
y: number
}
let drawPoint = (point: point) => { //...}
Ch 17:03:35:What is the naming convention on interface names?
Always use the first letter as a capital: i.e.: Point
Ch 20:02:29: Can you have a function inside an interface?
You can only define the shape of the function. You don't need to define the shape with input vars because that's already included in the interface block. You need to define the implementation elsewhere.
Ch 20:02:54: The following code applies the SRP (single responsibility principle) but violates what other principle?
interface Point {
    x: number,
    y: number,
    draw: () => void;
}
let drawPoint = (point: Point) => { ... };
let getDistance = (pointA: Point, pointB: Point) => { ... }
Cohesion principle. To adhere to the cohesion principle these functions should all be encapsulated in a class. Then we have both SRP and Cohesion principles. Additionally, Modules have cohesion principles. Modules should have one, and only one responsibility.
Ch 20:04:46 How do you define a class method?
Just the name of the method and any EXTERNAL parameters. Methods can use any internally set fields. i.e.:
class Point {
    x: number;
    y: number;

    draw() { uses x and y within the method.  Note, no function or arrow function declarations.  This is a method within a class.}
}
Ch 21:03:54: What is an instance of an object?
An object is an instance of a class. i.e.: class Point {
x: number;
y: number;
draw() => void;
getDistance(another: Point) {
// ...
}
}
let point = new Point(); // point is now the new instance of the Point object.
Ch 21:01:40: What is the difference between let point:Point; and let point = new Point()
let point:Point; has not allocated any space in memory for the custom "type" -- our class.
Ch 21:01:40:What will happen in the following code: let point:Point; and let point = new Point()
class Point {
    x: number;
    y: number;

    draw() => console.log('X: ', this.x,  'Y:', this.y)

    getDistance(another: Point) {
        // ...
    }
}

let point:Point;
You will get a TypeError: Cannot read property of 'draw' of undefined. because you haven't allocated any memory for the object. You need to define point as
let point = new Point();
Ch 22:02:49: How do you make parameters in the constructor optional?
The same way you make them optional in typescript. With a "?". constructor (x?: number, y?: number)
Ch 23:00:49: What is an access modifier?
A keyword to control the use of the field, property or function. i.e.:
class Point {
    private x: number;
    private y: number;

    constructor(x: number, y: number) {
        this.x = x;
        this.y = y;


    public draw() {
        console.log('X: ' + this.x + ', Y: ' + this.y);
    }

    getDistance(another: Point) {
        // ...
    }
}

let point = new Point();
Now you cannot change the x and y coordinates of a point. Calling point.x = 4 will yield an error in your IDE.
Ch 24:00:27: What are two ways to declare a field public, private, or protected?
Either declare the field with the access modifier or precede the constructor param with public or private access modifiers
 class Point {
    private z: number;

    constructor(private x:number, private y:number, z:number) {
        // variables x and y are automatically declared; No need to add them to
        // field declarations as in z above.
        this.z = z;
    }
}
Ch 23:02:45: If no access modifier is specified, what is the default access?
public
Ch 25:00:00: What is the difference between fields and properties?
Most people confuse the two, calling properties fields. In actuality, a field is declare like a var with or without access modifiers. A property is the fence between public access of the field value. For instance:
A field: private x:number;
A property:
    get x() {
        return this._x  //notice you've renamed the field to _x to make the getter or setter function more intuitive
    }
Ch 25:05:12: How do you call the getter method?
let x = point.x;
Ch 25:04:59: How do you call the setter method?
point.x = 10;
Ch25:04:59: If I declare a private field, whether in a constructor or in the class, and I still want to set that field if it meets certain requirements, or retrieve that field's value, how would I do this?
Use setters and getters:
                            get x() {

                                return this._x

                            }


                        set x(val) {

                            if (x > 0) {

                                this._x = val;

                            }

                        }
Then call it using:
                    point.x = 10;

                    let myx = point.x
Unlike fields, properties can assign or retrieve the field values by calling the getter or setter methods:
WRONG: point.set x(10)
CORRECT: point.x = 10;
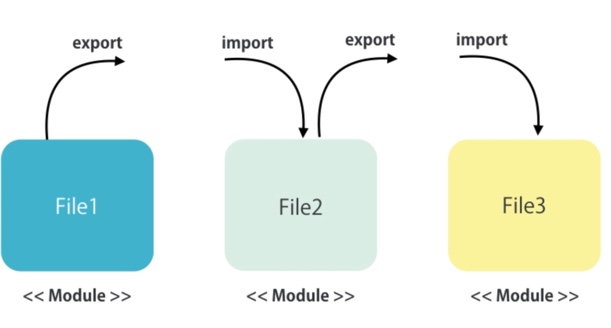
Ch26:01:02: What is a typescript module?
Typescript modules differ from Angular's definition of modules. From typescript's point of view, any .ts file that has exported classes, functions, single variables, or objects is a module.
Essentials: Section 3: Angular Fundamentals
Ch31:00:29: What comprises an angular component?
Data, HTML Template, Logic
Ch31:01:55: Let's say there's only one component in an angular application. What must its name be?
App component
Ch31:02:05: What is an angular module?
A module is a container for a group of related components. Every angular app has at least one module, called app module.
Ch32:00:19: What are the steps for creating a component?
Create a component.
Register the component in a module.
Add an element in an HTML markup
Ch32:01:07: What is the naming convention for a component?
Question: What if you're in a complex tree and your module is up two levels, where app module is up four levels? What does it update ... app.module.ts or the module up next.
What does {{ }} do?
It renders content dynamically.i.e.:
@Component({
selector: 'courses',
template: '
{{ title }}
'
})
export class CoursesComponent {
title = "List of courses";
}
When a variable that is used in the component file updates, when does the component update?
Immediately.
In the template object, when we want to expand the markup over multiple lines, can we just but a crlf within the ' '?
No. You need to change ' ' to ` `. Then your code can be written more clearly spanning multiple lines.
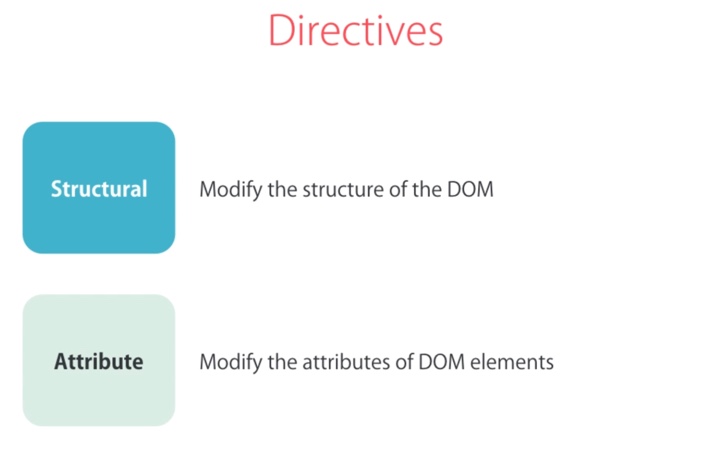
What is a directive used for?
To manipulate the dom. i.e.:
<ul>
        <li *ngFor=""></li>
<ul></p>
Why do you prefix a directive with an asterick. i.e.: <li *ngFor=""> ...
This is used whenever you're going to modify the contents of the DOM.
Write an ngFor loop for li's that are going to modify the DOM similar to a for each loop:
<li *ngFor="let course of courses"></li>. // here courses is an array of courses.
Within a template, how do you display the value of a variable defined within a component?
{{ courseName }}: Double braces;
Do you need any decorator with your service class decoration, like you need with a component?
1. import the service
2. Write a constructor for your component. Inside the constructor, declare the service object.
i.e.:
export class CoursesComponent {
        title = "List of courses";

    constructor () {
            let service = new CoursesService(); // initialize the service
            this.courses = service.getCourses();  // set our field to the value returned from the service.
    }
}
Why is creating a new instance of CoursesService inside the CoursesComponent a bad pattern?
Because that way you tightly couple the CoursesService to the CoursesComponent. If you change the CoursesService constructor to take parameters you need to go back to each place you instanciated the CoursesService and modify the argument list.
How do you decouple the instantiation of the service inside the constructor of your component from the component?
Use dependency injection.
When you use dependency injection, what are the two places you need to update?
1. In the constructor of the component where you want to use the dependency: constructor (service:CoursesService) { ... };
2. In the module where the component is registered, you must update the module to tell Angular that the components in this module have dependencies: @NgModule({ ... providers: [CoursesService], ...})
What happens when you forget to register a service in the providers array of the module?
ERROR Error: No provider for CoursesService!
In addition, you won't see the courses in the browser.
Let's say within your module you have hundreds of components. What happens in the provider's array with the service? Do you have one, or many of the providers instantiated?
No. This is a Singleton pattern. One instance of the provider will be instantiated for ALL of the components.
Ch 38: How do you create a service automatically in angular cli?
$ ng g s <serviceName> // g for generate; s for service;
When you run ng g s <serviceName> how many files are automatically generated, and what are they called?
src/app/email.service.spec.ts
src/app/email.service.ts
When do you need to use @Injectable() decorator in a service?
Only when that service takes arguments.
Essentials: Section 4: Displaying Data and Handling Events
Ch31:00:29: What comprises an angular component?
Data, HTML Template, Logic
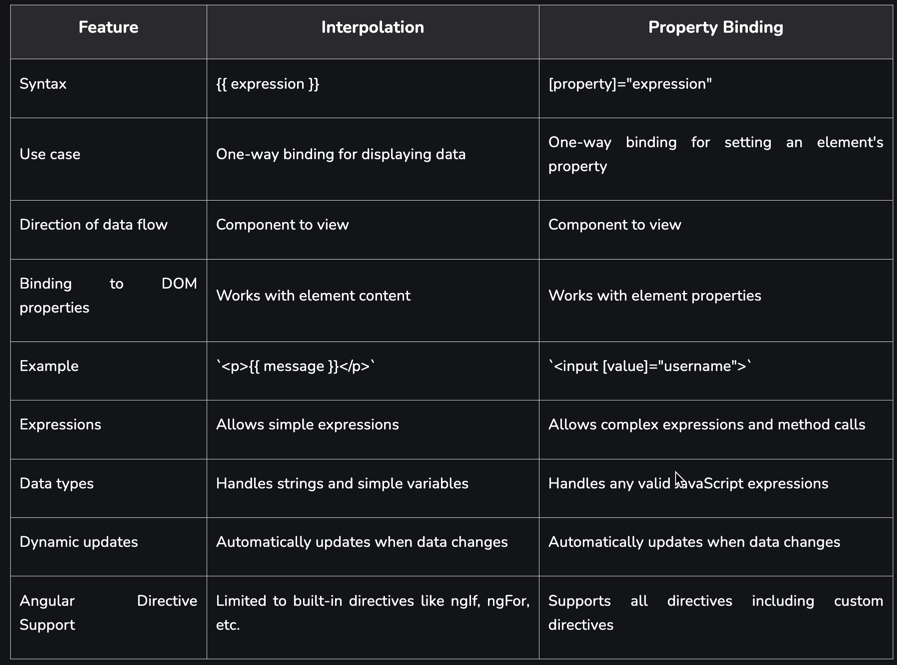
When would you want to use property binding over interpolation?
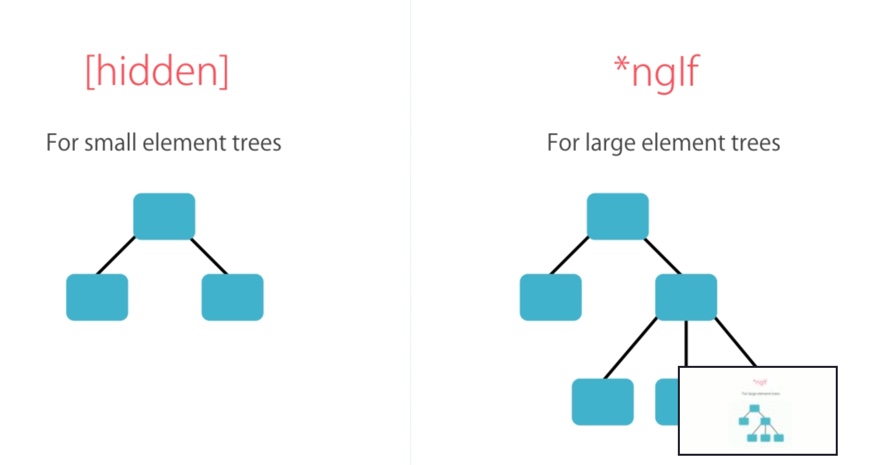
Basically interpolation and property binding do the same thing. However, interpolation cannot change any property other than the innerHTML, outerHTML, innerText or outerText With property binding you can bind any html property. i.e. in pseudo code: if (doNotDisplay) then <h2 [display]="hidden">HELLO THERE!</h2<
Also with property binding you can use complex operations to generate displays.
Ref:
If you have either a property binding or an interpolation string like {{ title }} where title=someDynamicString; with the DOM update as the dynamic string or property binding changes?
No. PropertyBindings and Interpolation strings are called 1-way bindings because they bind to the DOM, but the DOM does not communicate back if their values change.
With property binding, does every DOM object have the same objects as HTML properties?
No! For example, in the DOM, < h1 [textContent]="title" >< /h1 > the textContent property does not exist in HTML.
How do you tell what is represented in the DOM?
You need to know the object name in the DOM first. For instance, "style".
Anything shown in the elements tab of dev tools is what is in the dom. To see the properties of the element, go to the console tab and use something like getElementById, then inspect the element.
0:41: Google "dom style properties" or the html attribute name to see the properties available to that attribute in the DOM.
How do you set an attribute in the DOM if it normally doesn't exist. For example, 'colSpan', which exists on an HTML element, but it does not exist in the DOM?
<td [attr.colspan]="colSpan"> : Now you've added an attribute to the DOM which didn't exist there before.
How do you install bootstrap css stylings to your angular project?
$ npm install bootstrap --save
The first thing it does is downloads bootstrap and stores in your node_modules folder, and the --save adds bootstrap as a dependency in your package.json file.
Go into your style.css folder and import bootstrap from node_modules:
@import "bootstrap/dist/css/bootstrap.css"
How do you add a class binding which would be a dynamic property binding to your html?
Use the [] property binding: < button class="btn btn-primary" [class.active]="isActive">
How do you find all of the DOM style object properties?
Google "dom style object properties". This would also give you a hint at what properties are available on the DOM if you get a compilation error.
How do you set the DOM style object properties in angular?
Rather than "style="background-color: black"", you need to use attribute binding for the DOM: <button [style.backgroundColor]="isActive ? 'blue' : 'white':
What is wrong with this syntax in your template markup? <button style="backgroundColor: blue" ></button>
Here you're setting a DOM property. You need to do this with property binding: <button [style.backgroundColor]="isActive ? 'blue' : 'white'"></button>
How do you add an event to an element in the DOM?
Almost identically to the way you handle it in HTML.
<button (click)="onSave()">Save</button>
Then, in your class, you write a function called "onSave".
Let's say you want to get a handle on the click event on your button. How would you do this?
Pass in to the click call $event:
<button (click)="onSave($event)">Save</button>
Then in your class, you write your function "onSave($event)"
If you do not have stopPropagation on the click event on your button, and you have a <div> parent who also has a click event, what happens?
If you have a click event on any parent element, the click event will bubble up to all click events until the event has bubbled up to the top. This is why stopPropagation is so important to use.
Describe what happens to the following click event:
<div click="() => console.log(`div was clicked`)"; />
<button click="() => console.log(`button was clicked`)"; > Click Here < /button>
You will get two console.logs:
1. button was clicked
2. div was clicked
How do you stop event propagation?
1. pass the $event into the event handler call.
2. within the event handler, use the $event to stop propagation: $event.stopPropagation();
How would you improve the following code in angular?
<input (keyup)="onKeyUp($event)" />

onKeyUp($event) {
     if ($event.keyCode === 13) console.log("ENTER was pressed.");
}
<input (keyup.enter)="onKeyUp()" />

onKeyUp() {
    console.log("ENTER was pressed.");
}
How do you use variables in template, so you can access them back in your component?
Within the element, declare the variable #email, then pass that variable back to your component on the event binding:
Banana in a box : used for two way bindings within templates.
What is missing in the banana in a box notation? [()]
1. You haven't bound it to ngModel,
2. You haven't made the variable assignment to the variable declared in the component. [(ngModel)]="email"
3. You haven't imported ngModel into the main apps.module.ts file in the imports: [] array.
a. import { FormsModule } from '@angular/Forms';
b. imports: [
BrowserModule,
FormsModule
]
NOTE: What I don't know is if this really belongs in the apps.module, or the module just above this component.
What are pipes used for in angular?
To format data:
Uppercase
Lowercase
Decimal
Currency
Percent
You want to display the following:
course.title like COURSE
course.title like course
course.students 30123 with a comma like 30,123
course.price like $2.25
How would you do it?
{{ course.title | uppercase }}
{{ course.title | lowercase }}
{{ course.students | number }}
{{ course.price | currency:'USD':true:'3.2-02'}} //true for display the currency sign $
{{ course.releaseDate | date:'shortDate' }}
You do not need to import CommonModule if you've already imported what module?'
BrowserModule includes CommonModule
What file do you need to implement a pipe called summary, and where would you put the file?
app/summary.pipe.ts
This is just an approximation - you can see it's <typeOfPipe>.pipe.ts for the naming convention.
NOTE: I'd bet that summary.pipe.ts goes where it is most likely to be used. Whether that's a utils folder, or the app folder or just the currently connected folder where you're going to use it.
What two libraries do you need to write a custom pipe?
import { Pipe, PipeTransform } from '@angular/core'
You've written a custom pipe as shown in the previous question: {{ summaryText | summary }} but you want to limit the length of the summary to 10 characters. How would you modify both the summary pipe and the SummaryPipe class?
First, the call to the pipe summary should take an argument of the number of characters you want to limit the summary to:
{{ summaryText | summary:10 }}
Second, modify the class to take an optional argument, and rename the argument for transform to limit, rather than args.
Essentials: Section 5: Building Re-usable Components
Up to this point you can declare variables, and use them within the component's template. Now you want to be able to pass a value in to your component like passing props, and use it in your component's template. How would you do this?
// component where variable values are coming in.  Much like passing props to this component.
import { Component, Input } from '@angular/core';

export class FavoriteComponent implements OnInit {
        @Input() is Favorite: boolean;
        ....
}

// Your component's element - used by another template:
<favorite [isFavorite]="usersFavorite" > </favorite>
Because if you change the name of myFavorite within the class, all references to myFavorite will automatically update to the new name -- but the inputs array will not change. Why?
Because inputs: [] creates a completely separate variable named myFavorite.
It is better to use the @Input() decorator and import that.
How do you alias an input variable, and why?
export class myTemplate {
    @Input('isFavorite') isSelected: boolean;
}

// someone else's template calling your myTemplate
>myTemplate [isFavorite]=myFavorite> >/myTemplate<
If, for some reason you need to change the isSelected variable inside your component to another name, none of the other components need to change it. You've aliased it, so all other components/templates can reference it by its original name -- and you're free to change it as you would like.
You've renamed a variable in your component, and the variable is aliased so other templates don't have to worry about the rename. However, now you've broken your template. Why?
Did you rename the variable use within your template as well? Aliases only apply to incoming values -- the variable names are used inside the component's template, not the aliases.
What steps need to be taken to emit an event from one component, and catch that event with another component?
1. In the catching component, write the function for the event: onFavoriteChanged() { 'console.log(app.component.ts : onFavoriteChanged()');}
2. In the catching component's call to the template, add the event call: >myTemplate (change)="onFavoriteChanged()"< >/myTemplate<
3. In the sending component (myTemplate):
a). import the Output decorator and EventEmitter from angular/core: import { Component, Input, Output, EventEmitter } from '@angular/core';
b). Create a field with the exact same name as the event and decorate it with @output and initialize the field to an instance of the event emitter class: @Output() change = new EventEmitter();
c). In the event handler in myTemplate class, raise the event: this.change.emit();
How do you pass data from the eventemitter to the event handler in another component?
1. Add the argument to the event emitter:
this.change(isSelected)
2. Tell the event handler in the other component that an argument is coming in:
NOTE: In this case, $event is what you've passed -- not the entire event like with event.target.value. It would simply be the boolean value of isFavorite.
What would you do if you wanted to honor the contract with other components, but you need to change the variable name of your Output variable from change to onSelected?
@Output() change = new EventEmitter();
What would you do if you wanted to honor the contract with other components, but you need to change the variable name of your Output variable from change to onSelected?
@Output() change = new EventEmitter();
Use an alias. Set the alias to the original name that other components are using, then change the name of the variable.
@Output(change) onSelected = new EventEmitter();
What are two ways of using templates?
1. Use the templateUrl: key within your @Component object.
2. Use an inline template with the template: key within your component.
@Component({
    template: `
            MyComponent
            Hello!
    `
})
Where is the template code located in the bundles?
Within the main.bundle with the other code. There is not a separate file for template code.
What are three ways of declaring styles in your component?
styleUrls: ['./favorite.component.css'] within your @Component({}) object,
styles: [
        `

        `
]
Inline within our templates.
If you use both styleUrls: and styles: within your component, what will happen to your styles?
Only the 2nd style declaration will take effect. The 1st will be forgotten.
If you are going to place styles within your template, how would you do this?
The same as normal html:
>style< >/style<
If you declare a style for an element in one of your components, will that style bleed over to other components?
No. Because of the Shadow DOM surrounding your component by default.
What does the shadow DOM do?
It allows us to apply scoped styles to elements without bleeding out to the outer world.
Will the following code bleed outside to other components?
var el = document.querySelector('favorite');
el.innerHTML = `
        >style<h1 { color: red } >/style<
        >h1<Hello>/h1<
    `;
Yes - because you've changed the DOM - not the Shadow DOM'
How do you keep your style from the last question bleeding out to the rest of your h1 elements?
Add: var root=el.createShadowRoot(); before your innerHTML styling, then use the innerHTML on your shadowRoot.
var el = document.querySelector('favorite');
var root=el.createShadowRoot();
root.innerHTML = `
        >style<h1 { color: red } >/style<
        >h1<Hello>/h1<
    `;
Do most browsers support Shadow DOM?
No. Only the most recent browsers support this. You can verify by going to dev tools and looking at the elements of a component. If you see Shadow DOM, you'll know this browser supports it.
How would you emulate shadow DOM, if your browser does not support it?
Emulate the shadowDOM by using view encapsulation:
What do you see on the element tab in dev tools when you emulate the shadow dom?
It inserts _ngcontent-c1on each element in this component to identify all elements on this component. Then the styles are ONLY applied to the element with this class on it. These are generated only at runtime.
Typically, would you use encapsulation: ViewEncapsulation.Native?
No. It is only supported by Chrome v53 or higher and Safari v10 or higher, you need to go to your Preferences in Chrome and select "Show user agent shadow DOM"
You can inspect your element and see #shadow-root (open) on your element.
If you don't see it, go to your settings, Preferences, Elements, and select "Show user agent shadow DOM"
Using encapsulation: ViewEncapsulation.Native, and you have either correct version of Chrome or Safari, yet you still do not see your shadow-root section with the style for your icon. Why?
No sure about this answer: Or maybe its the question:
When using encapsulation mode native, you may have to import your global styles into your component to see them within the shadow-root area.
What happens when you use encapsulation: ViewEncapsulation.None
Your styles may leak outside of your component.
What is the preferred way of using encapsulation?
encapsulation: ViewEncapsulation.Emulated in your @Component object. Here you are not browser specific, you have a shadow DOM to prevent styles leaking, and you don't have to make special imports just for shadow DOM to show icons.
What is the default value for encapsulation: ViewEncapsulation?
encapsulation: ViewEncapsulation.Emulated
If this is what you want, you do not need to place the encapsulation key inside your component object. This is the default setting.
What is the shorthand in vscode for creating the following element structure?
div.panel.panel-default>div.panel-heading+div.panel-body then tab.
How would you build a reusable component?
Build the reusable component, specifiying the injection points with ng-content giving the injection points a selector name such as ".body" or ".heading":
Do you need a selector when you have only one ngContent?
No
In your template, you do not want to have the extra <div>Heading</div> but instead just want to write some content, like "Heading". Modify the following reusable component so that Heading does not have a div surrounding it.
<div *ngIf="courses.length > 0" >
     List of courses
</div>
<div *ngIf="courses.length == 0">
    No courses available.
</div>
You need to change your conditional div to ng-template, assign it a template name, then use that in the first conditional.
<div *ngIf="courses.length > 0; else noCourses" > // using the template name in the conditional block
    List of courses
</div>
< ng-template #noCourses > // ng-template with a template name.
    No courses yet
</ng-template>
When you are dynamically rendering objects in the DOM, if you change an object's reference -- event with identical information -- the DOM is re-rendered. Say you have a list of 1000 objects -- and you change the array that contains those objects but only one element in that array is changed -- the DOM will re-render the entire 1000 objects.
To save time, use trackBy and tell the DOM what to look for if the object has changed. You need to write a trackBy function though.
Write the HTML and function to track a list of courses for your *ngFor loop.
What does the asterick do to the markup when you use it, for instance, before *ngIf
    What does the asterick do to the markup when you use it, for instance, before *ngIf

    Original markup:
    <div *ngIf="courses.length > 0; else noCourses">
         List of courses
    </div>
    <div #noCourses>
       No courses
    </div>
It will move surround each if block with ng-template, then put the conditional inside an ngIf attribute, removing the template names as they are no longer needed
    <ng-template [ngIf]="courses.length > 0"> // adds ng-tmeplate wrapper; adds attribute [ngIf] set to condition; removes template name.
        <div>
             List of courses
        </div>
   </ng-template>
   <ng-template [ngIf]="!(courses.length > 0)">
        No courses
   </ng-template>
What are two ways to write an element that will appear based upon a specific condition?
Use the #<elementName> construct:
    <div *ngIf="courses.length > 0; else noCourses">
        List of Courses
    </div>
    <div #noCourses>
        No courses
    </div>
Use the default ng-template when there is only one ng-template:
    <div *ngIf="courses.length > 0; else noCourses">
        List of Courses
    <ng-template>
        No courses
    </ng-template>
What are two ways bind a class to an element conditionally?
Set the specific class attribute: [class.glyphicon-star]="isSelected"
What is the difference between using class attributes settings vs. ngClass settings?
Class attribute settings take the specific class: [<className>.<attributeName>]=""
ngClass settings takes a key:value pair where the key is the class name, and the value is the class name setting- like "style.borderColor"="black", or "hidden":true, or "hidden":isHidden,
In your template, what are two ways of modifying the style of an element?
In your template, what are two ways of modifying the style of an element?
use the [style.backgroundColor]="canSave? 'blue' : 'gray'"
use the ngStyle directive: [ngStyle]="{ 'backgroundColor': canSave ? 'blue' : 'gray'}"
What is the save traversal operator
? Use like: myObj.key1?.name: using the "?" will tell angular (and javascript/typescript) not to try to evaluate the name if there is no "key1"
What is the command line syntax to create a custom directive? What files are created/updated?
$ ng g d input-format
src/app/input-format.directive.spec.ts
src/app/input-format.directive.ts
updates src/app/app.module
In app.module.ts, where is your new directive updated?
Where are all the components, pipes and directives registered?
/src/apps/app.module.ts:
@NgModule({
    declarations: []
    ... });}
What are the steps to write a custom directive?
import { Directive, HostListener, ElementRef } from '@angular/core';
Add the @Directive({ selector: '[appInputFormat]' }) decorator to your new directive class
Set a variable to receive on input: @Input('format') format:string;
Inject the ElementRef into your custom directive class: export class appInputFormat(el: ElementRef) {...}
Set a field for your class that will store the native value: let value: string = this.el.native.element.value
Setup a function that will execute when the native event is triggered - call it onBlur perhaps, but use the native DOM event called 'blur' for the @HostListener to listen to that event.
Inside any element, you would use the directive [appInputFormat] just as you use [*ngFor] or [*ngClass]
import { Directive, HostListener, ElementRef } from '@angular/core';

@Directive({
    selector: '[appInputFormat]'
})
export class appInputFormat( el: ElementRef) {
    // use the native element from the DOM to get a reference to the element
   let value: string = this.el.native.element.value;
   // use @Input to receive the format variable value
   @Input('format') format: string;

   @HostListener('blur') onBlur() {
           if (this.format === 'uppercase') {
                 this.el.native.element.value = value.toUpperCase();
           } else {
                 this.el.native.element.value = value.toLowerCase();
          }

   }
}
What is HostListener?
It listens to any element that has this directive included.
How do you use HostListener?
It is like a decorator, but it is used on a function.
@HostListener takes the name of the event inside the dom to listen to: 'focus' or 'blur'.
@HostListener is used on the method of the custom directive class.
// subscribe to the 'focus' DOM event
@HostListener('focus') onFocus() {
        console.log("on Focus");
}

// subscribe to the 'blur' DOM event
@HostListener('blur') onBlur() {
        console.log("On Blur");
}
<input type="text" [appInputFormat]="'uppercase'">
Then modify your custom directive, chaging the @Input('format') format; to @Input('appInputFormat') format;
Write the vsCode autocomplete notation for the following:
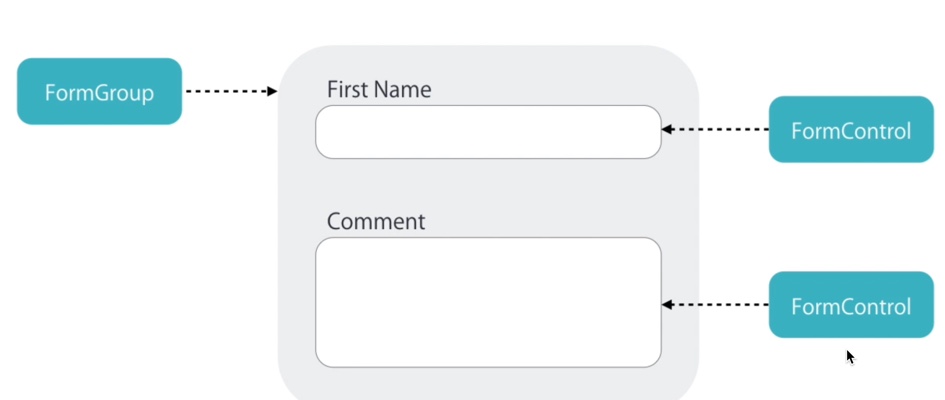
For each input field in a form, we need to check values, whether it's dirty, pristine, etc. What class(es) might you use and what attributes would they set?'
Use FormControl for each input box ort field, or use FormGroup for a group of input boxes (each with their own FormControl). Each yield the following:
value
touched
untouched
dirty
pristine
valid
errors
What does a FormGroup return if ALL the fields in the FormGroup are valid?
True
When do you use a Reactive form vs. a Template-driven form?
Reactive:
More control over validation logic
Good for complex forms
Unit testable
Template Driven:
Good for simple forms
Simple validation
What are two ways to use ngModel, and what are the differences?
For two way binding of variables, you would use banana in a box: [(ngModel]) name="<someName>" within an element.
For the simplest form, ngModel name="name" will provide tthe settings of formControl within the ngModel object -- so you don't need to explicitly define class="form-control"'
How do you add error messages under your input control?
Place an immediate <div> under the input control; Assign it bootstrap classes of "alert alert-danger", then give it some conditions
Create an input control, without using form-control class
Use ngModel and set your template name to ngModel.
<div "alert alert-danger" *ngIf="!firstName.valid">First Name is not valid </div>
<div "alert alert-danger" *ngIf="firstName.length < 3">First Name must be more than 3 characters. </div>
How do you make an input field required and display the validation error if the field is left blank on the form?
On the input element, place the required directive. <input required ...>
Create a div under the input element with the validation specifications:
<div class="alert alert-danger" *ngIf="!firstName.valid && firstName.touched">First Name is required.</div>
This uses the template variable #firstName from the input element and the bootstrap classes "alert" and "alert-danger" along with ngModel's .valid and .touched attributes.
How do you make an input field required and display the validation error if field is left blank? (Display ONLY if the input field is not valid AND the user has tabbed out of the input field.)
<div class="alert alert-danger" *ngIf="!firstName.valid && firstName.touched">First Name is required</div>
This uses the template variable #firstName and the bootstrap classes alert and alert-danger along with ngModel's .valid and .touched attributes.
How do you set the minimum and maximum length of an input field?
Set the minlength and maxlength directives on the inputfield:
<input required minlength="3" maxlength="10" ngModel name="FirstName" #firstName .../>
<div class="alert alert-danger" *ngIf="firstName.touched && firstName.minlength > 2">First name must be at least 3 characters</div>
<div class="alert alert-danger" *ngIf="firstName.touched && firstName.maxlength > 10">Last name must be less than 10 characters</div>
If you have multiple validation errors, how do you write that for an input field?
Use seperate div for each validation error, with the reason for the error in the divs text. (See above)
You want the input box to gain focus when the user clicks on the label of the input box. How would you do this?
Use the for directive with the id of the input element on the label.
How do you associate an <input> element that is defined as an ngModel, with the name of the <input>?
Not with name="firstName", but with the template variable #firstName=ngModel. Then in the ngIf, to validate the input field, you can use firstName.valid.
What is an alternate way of writing an error for the input field which is a required field:
 <input required minlength="3" maxlength="10" pattern="banana" type="text" />
// errors below
<div class="alert alert-danger" *ngIf="!firstName.touched && firstName.valid></div>
    <div *ngIf="firstName.minlength" >First name must be a minimum length of 3 characters.</div>
    <div *ngIf="firstName.required">First name is required></div >
</div>
Use the errors from the templateName.errors object
<div class="alert alert-danger" *ngIf="!firstName.touched && firstName.valid></div>
    <div *ngIf="firstName.errors.minlength" >First name must be a minimum length of 3 characters.</div>
   <div *ngIf="firstName.errors.required">First name is required></div >
</div>
What are the standard HTML errors?
minlength
maxlength
pattern="a reg expression or string"
How do you provide a dynamic error message?
<div ...>Minimum chars required is {{ firstName.errors.minlength.required }} characters</div>
<div ...>Maximum chars required is {{ firstName.errors.maxlength.required }} characters</div>
How would you add a solid red border to a form control input field when there's an error?
You have used the ngModel directive on your input element to make this input an input control element, however what else do you need to add to make the input validate on the following critera?
The input is required
The input must be a minimum of 3 characters
The input must be a maximum of 10 characters
the input must be "banana"
the input needs to pass the value for the input firstName to a on change function that will only log the firstname.
the input element must perform validation on the input.
Add the following directives to the input element:
required : // to make sure there IS an input
minlength="3" : setting the HTML minlength property
maxlength="10" :setting the HTML maxlength property
pattern="banana" : setting the HTML regexp property
name="firstName" : to pass the value of your input to your on change function
#firstName="ngModel" : so you have access to the .valid, .errors, etc. properties
(change)="log(firstName) : using the DOM's on change event, pass the input string'"
You want to validate on the form. There are steps to do this. Name them:
On your control objects (input) you can check if the individual controls are valid using the template variable for the control.
on your form element, you've created a template name #f. Check !f.errors
What is the vsCode shorthand for creating the following code:
< div class="radio">
    <label>
        <input type="radio" name="contactMethod">
    <label>
</div>
How do you associate an <input> element that is defined as an ngModel, with the name of the <input>?
Not with name="firstName".
Use the template variable #firstName=ngModel. Then in the ngIf, to validate the input field, you can use firstName.valid.
ngModel gives the template name #firstName all of the properties in an ngModel.
What is an alternate way of writing an error for the input field which is a required field:
<input id="firstName" required minlength="3" maxlength="10" pattern="banana" type="text" />

// errors below
<div class="alert alert-danger" *ngIf="!firstName.touched && firstName.valid></div>
    <div *ngIf="firstName.minlength" >First name must be a minimum length of 3 characters.</div>
    <div *ngIf="firstName.required">First name is required></div >
</div>
Use the errors object exposed through name of the input object: [check this out, was this ngModel?]
<div class="alert alert-danger" *ngIf="!firstName.touched && firstName.valid></div>
    <div *ngIf="firstName.errors.minlength" >First name must be a minimum length of 3 characters.</div>
   <div *ngIf="firstName.errors.required">First name is required></div >
</div>
How do you provide a dynamic error message?
<div ...>Minimum characters required is {{ firstName.errors.minlength.required }} characters.</div>
If angular finds an element of <form>, and it is not an ngNoForm, nor formGroup, angular is automatically going to apply what?
If they are NOT ngNoForm, and not formGroup, then the selector is either:
ngForm or
    [ngForm]
How would you bind the ngSubmit event to our own event, passing in the values from the <form>?
<form #f="ngForm" (ngSubmit)="submit(f)"></form>
>
Using ngModelGroup, how would you group together all input field validations and validation errors. Say your contact form looks like:
firstName:
lastName:
ou will want a submit button. This comes with ngForm. You will want to bind your submit function with the ngSubmit event that is fired when the submit button is pressed:
<form #f="ngForm" (ngSubmit)="submit(f)"></form>
You will want to group your fields in your form, like firstName and lastName together in an ngModelGroup div and name it.
<div class="alert alert-danger" *ngIf="firstName.touched && ... mumble ...>
    <div *ngIf="!contact.valid">
        <div *ngIf="!contact.firstName.touched">Must have a value for first name.</div>
        ...
   </div>
What is the difference between ngForm and ngModelGroup?
ngForm would need a submit button and a submit event on the form, where ngModelGroup does would not.
ngModelGroup would be used for complex groups where multiple ngModelGroups are used
How would you disable the submit button on an ngForm?
<button class="btn btn-primary" [disabled]="!f.valid">Submit*lt;/div> // binding the disabled HTML property to !f.valid
>
where #f is a template class applied to the <form ngForm #f="ngForm" (ngSubmit)="submit(f)">
Do you need to define your form as an ngFormGroup?
No - Angular will see the <form> element, and unless otherwise defined it will automatically create this as an ngFormGroup.
How would you create the following in VSCode:
<div class="checkbox">
        <label>
            <input type="checkbox">Subscribe to mailing list</input>
        </label>
</div>
div.checkbox>label>input[type='checkbox']
What do we need in addition <input type="checkbox">Subscribe to mailing list</> and why?
<input type="checkbox" ngModel name="isSubscribed">Subscribe to mailing list</>
Then Angular will create an instance of the form-control object for this input field.
You also need name="isSubscribed" to indicate the status of the checkbox.
How would you see the values of your form in your ui?
<p>
            {{ f.value | json }}
</p>
Adds to the bottom of your form:
{ "firstName": "", "comment": "asd", "isSubscribed": false }
ngModel should be added to what? And does one or more attributes need to be set?
Your form-control object. In this case, it would be <input type="checkbox" ngModel name="isSubscribed"<Subscribe</input>
ngModel will take your input and apply form-control to it. isSubscribed will be your boolean to store the value of ngModel.
What is the shorthand in vscode for the following and what do we need to add to this to make it a form-control?